Plans
What a restaurant pays you to be on your platform, and what each tier gets them.
Admin → Settings → Subscription plans · reporting on Admin → Plans
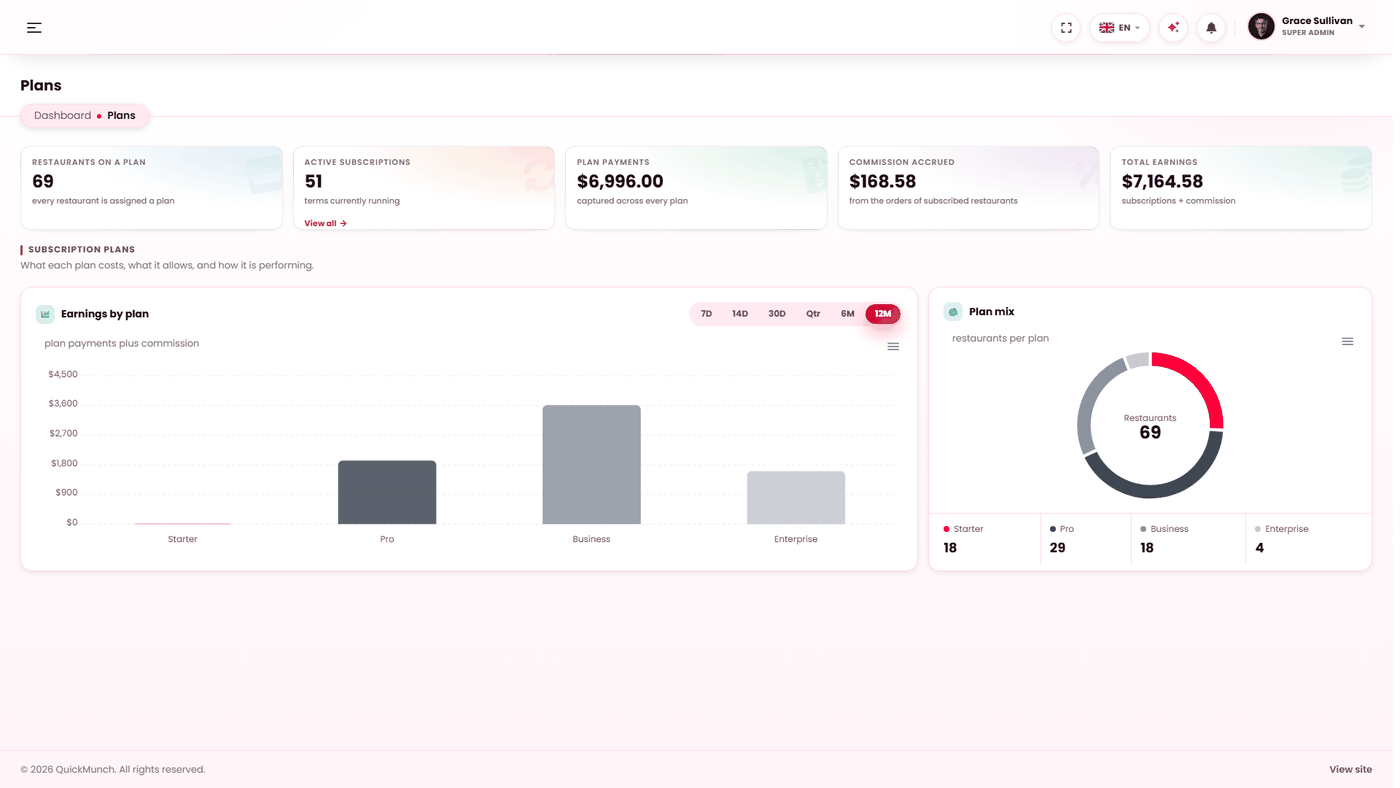
Every plan you sell, its price and how many restaurants are on it.
What a plan is
A plan is the package a restaurant subscribes to. It sets what they pay you, how often, what their account is allowed to do, and the commission you take on their orders.
Every restaurant sits on exactly one plan. Free plans are allowed and are the normal way to let a restaurant list at no cost while you still take a commission.
Set the price and the commission
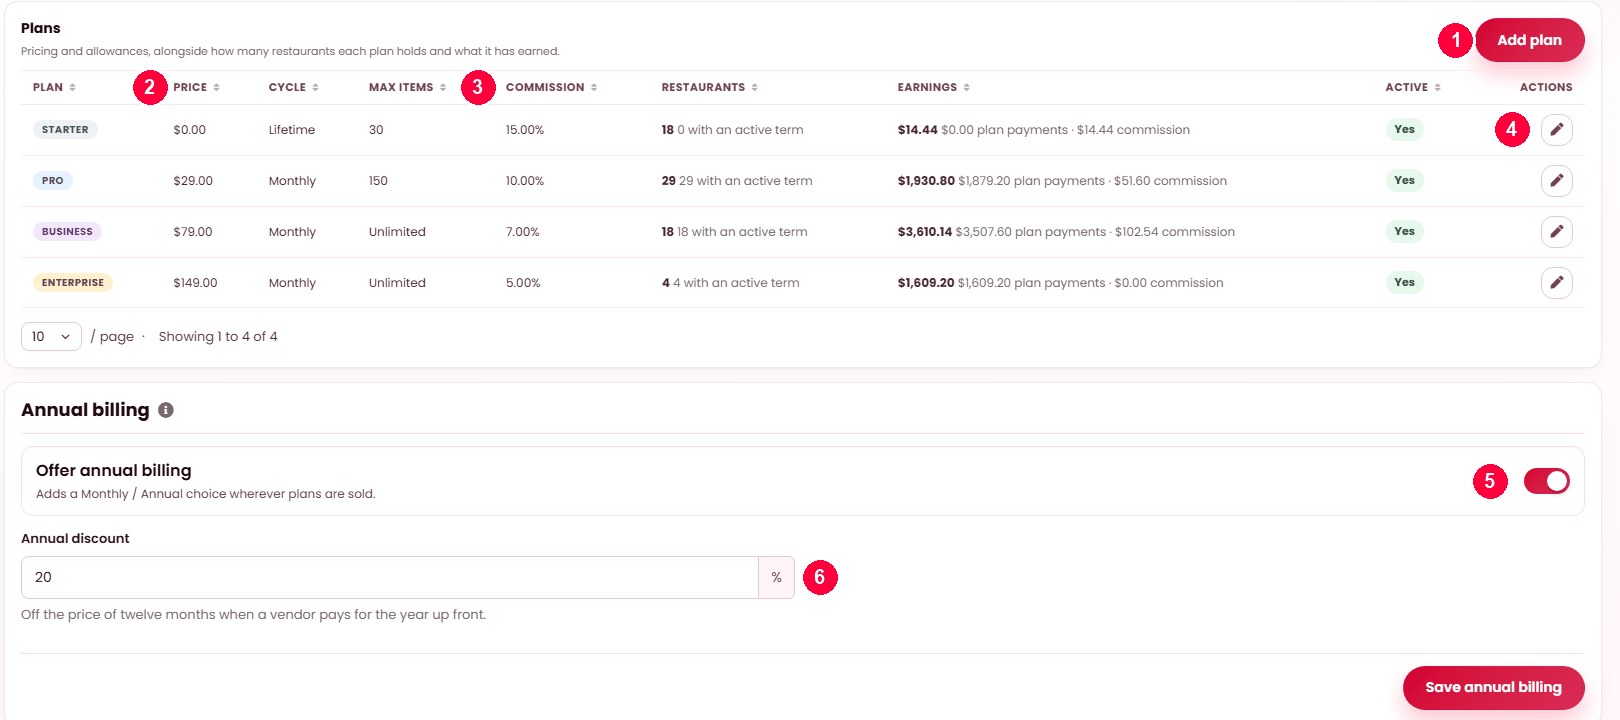
Both live on one tab. Admin → Plans is the reporting half — how each plan is performing; this is where you change it.
- Add plan — or use the pencil to edit one you have.
- Price — what the restaurant pays each cycle, before tax.
- Commission — your cut of every order that restaurant takes. It is a property of the plan, so all restaurants on a plan share its rate.
- Edit — price, cycle, item allowance, trial and features.
- Offer annual billing — adds a Monthly / Annual choice wherever plans are sold.
- Annual discount — the percentage off twelve months when a restaurant pays for the year up front.
Fields
| Field | What it does |
|---|---|
| Billing cycle | Monthly, yearly or lifetime. A lifetime plan is charged once and never renews. |
| Price | What the restaurant pays each cycle, before tax. |
| Commission (%) | Your cut of each order taken by a restaurant on this plan. Separate from the plan fee — you can charge one, the other, or both. |
| Max menu items | How many dishes the restaurant may publish. 0 means unlimited. |
| Free trial (days) | Days before the first charge. During a trial the account is fully active and nothing has been collected. |
| Require payment details on this free plan | On a free plan, still ask for a card up front. Useful when free is a trial of a paid tier rather than a permanent tier. |
| Features | The bullet list shown on your pricing page. Separate each with |. This is sales copy — it does not grant anything. |
Tax on what restaurants pay you
The tax charged on a plan is your tax, set once under Settings → Subscription plans. It is not the restaurant's own tax rate, which applies to food they sell — those are two different taxes with two different owners, and mixing them up is the most common mistake on this screen.
Prices are entered before tax. What the restaurant is charged is the price plus your platform tax, and that figure is what appears on their invoice.
Annual billing
Switch on Offer annual billing and set a discount percentage, and every monthly plan is also sold yearly at twelve times the price less that discount. The restaurant chooses monthly or annual when they subscribe.
Existing subscriptions are not affected — an annual agreement already running keeps charging what it agreed to, even if you change the discount afterwards.
Changing a plan's price
A price change applies to new subscriptions and to renewals arranged after the change. A restaurant part-way through a term keeps the price they agreed to until that term ends.
The restaurant sign-up page
A restaurant applies on one page (/vendor-signup): four steps side by side, one form,
one button. Each step's head carries a number, a title with a line on what the step is for, and a
check that turns green once the step is complete; the button at the end is enabled only when all
four are green, and pressing it is the agreement to the terms and privacy policy (the line under the
button says so — there is no checkbox). Required fields carry the * mark. The server
validates everything again on submit.
1 Your plan
The tiers as rows, the one chosen on the pricing page pre-selected; the Monthly / Annual switch (shown when the selected tier sells annually) repaints every row — on Annual each paid tier shows its yearly price with the monthly × 12 struck beside it, "/mo" and "/yr" as the pricing page writes them. A paid tier goes to the checkout and the account is created only once the gateway confirms; a free tier is created at once.
2 Your details
The owner's own account — what they sign in with. Continue with Google (when Sign in with Google is configured under Settings → APIs) opens a small Google window; the page stays where it is, and when the window closes the step shows the Google chip ("Signed in with Google as …"), name and email filled, the email locked, no password to invent. Use a different account on the chip swaps back. or fill in your details unfolds the typed fields — first and last name, email, phone, password and its confirmation — with Use Google instead as the way back. An owner who signed up with Google signs in with Google from then on (same address); Forgot password sets a password later.
3 Your restaurant details
The venue as customers see it. Two shortcuts sit at the top and never replace the fields: Find your restaurant on Google (needs a Google Maps key) lists the listings that match a typed name and a click fills the venue; Connect Google Business Profile (where Business Profile is enabled) opens a small Google window for the account that manages the listing — it can be a different account from the one in step 2 — and when it closes the block shows the chip, the account's businesses to pick from, and the one picked fills the venue. While a Business Profile with listings is connected that is the way the venue is entered; Disconnect takes back what the listing filled and brings or type the details back (the typed path has Use a Google listing instead as its way back). The connection needs a third redirect URI on your Google Cloud app; Settings → APIs shows it.
The venue then reads as three sections, one open at a time, each head summarising what is inside: Restaurant details — name, address, city, state, postcode, cuisine, website (the map pin and the service options come with a listing); Opening hours — optional: the same seven days Settings → Opening hours saves, a switch per day (off = Closed) and open/close times; a listing's hours land here, a typed application may set them here, and an untouched editor saves nothing (the venue counts as open until Settings says otherwise); Menu — shown once a listing with a menu is picked: the listing's dishes section by section, each ticked with its price and Select all · Select none; untick what you don't want, fix a price, and the ticked dishes are on the new menu the moment the account exists (the rules of Menu → Import apply — a dish needs a price, the plan's dish ceiling is respected).
4 Payment
How the plan is paid for: the gateway, when more than one is on (card, PayPal or a hosted-page gateway), and the note on what happens next — a paid tier is approved on the next screen and the account is created once the payment is confirmed; a free tier says so. Then the button — Continue to checkout or Create my account — and the consent line naming it.
When it doesn't work
The Plans screen is not in my menu
You are running the My own restaurants model, which has nobody to sell a plan to. See Choosing a business model.
A restaurant is on the wrong plan
Change it from that restaurant's record, not from here. Editing a plan changes it for everyone on it.