Payments & gateways
How customers pay you, and how the money that moves after checkout gets recorded.
Admin → Settings → Payment
What you get without doing anything
Two payment methods are on from the first day and need no account, no keys and no internet connection to a provider:
- Cash on delivery — the customer pays when the order arrives.
- Offline payment — you write your own instructions, such as a bank transfer, and they appear at checkout.
A shop that only ever uses these two is a complete installation. Nothing below is required.
Adding a card gateway
Eight online gateways are available and every one is optional: all stay switched off until you save your own keys, and until then the application makes no request to any provider. Stripe and PayPal take the payment on your own checkout page; the six hosted-page gateways below send the customer to the provider and bring them back.
You need your own account with the provider. No keys are supplied with the product, and the keys you save are stored in your own database on your own server.
Creating your Stripe API keys
- Create a Stripe account, or sign in.
- Turn Test mode on with the toggle at the top right while you are testing.
- Open Developers → API keys (test), or API keys (live) when you go live.
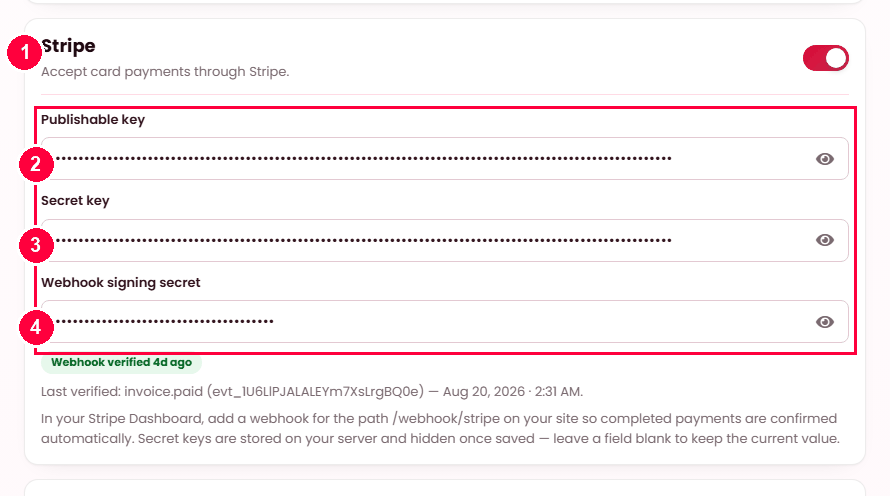
- Copy the Publishable key (
pk_test_…) and reveal and copy the Secret key (sk_test_…).
- Turn Stripe on.
- Publishable key — starts
pk_. - Secret key — starts
sk_. - Webhook signing secret — starts
whsec_; you get it from the webhook below.
Press Save settings.
Creating your PayPal API credentials
- Sign in to the PayPal Developer Dashboard.
- Open Apps & Credentials → Sandbox for testing, or Live for production.
- Choose Create App and open it.
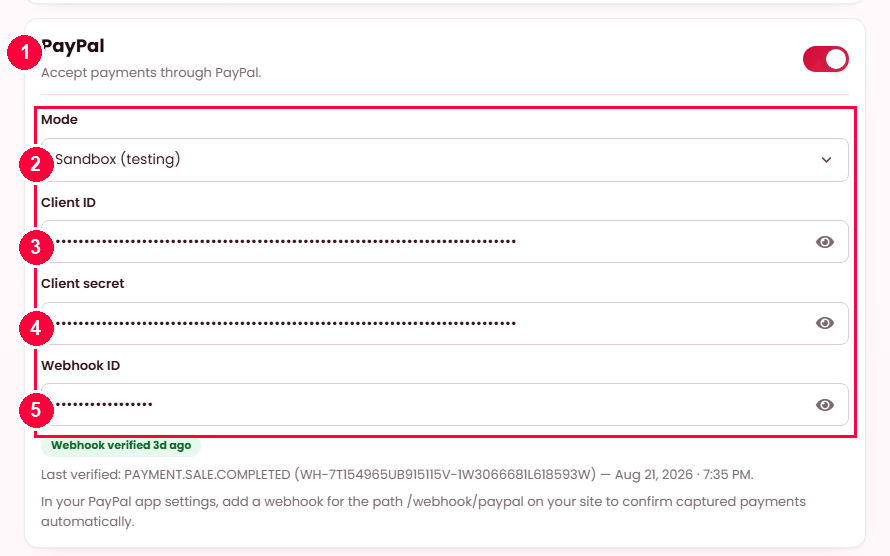
- Copy the Client ID and Secret.
- Turn PayPal on.
- Mode — Sandbox or Live; match the tab your keys came from.
- Client ID.
- Client secret.
- Webhook ID — you get it from the webhook below.
Press Save settings.
Hosted-page gateways
Six more gateways take the payment on the provider's own page: the customer places the order, is sent to the provider, pays there, and is brought back to your site, where the order is confirmed with the provider before it is marked paid. Nothing is entered on your pages and no provider script is loaded on them.
| Gateway | Where it is used | Mode switch | Currencies |
|---|---|---|---|
| Mollie | Europe — cards, iDEAL, Bancontact, SEPA and more | None; the key decides (test_ / live_) | EUR, GBP, USD and 25 others |
| Square | US, Canada, UK, Australia, Japan, Ireland — cards | Sandbox / Live | USD, CAD, GBP, AUD, JPY, EUR |
| Paystack | Nigeria, Ghana, South Africa, Kenya — cards, bank, mobile money | None; the key decides (sk_test_ / sk_live_) | NGN, GHS, ZAR, KES, USD and others |
| Flutterwave | Africa — cards, bank transfers, mobile money | None; the key decides (FLWSECK_TEST- / FLWSECK-) | NGN, USD, GBP, EUR, GHS, KES and others |
| PayU | India — cards, UPI, net banking, wallets | Test / Live | INR only |
| SSLCommerz | Bangladesh — cards, mobile banking, internet banking | Sandbox / Live | BDT, USD, EUR, GBP and others |
Each card lists the currencies the provider takes. A gateway is only offered at checkout while your platform currency (the Currency card at the top of this tab) is one of them; the card says so in a line under the fields when it is not.
Three things are the same for all six, and different from Stripe and PayPal:
- Refunds work from the order screen, exactly as with a card order — the money goes back through the provider that took it.
- A subscription plan bought through one is a prepaid term. None of these providers holds a card that could be charged again, so a monthly or yearly plan paid this way runs for one term and the restaurant renews it from their Plans page — see Plans (restaurant). Stripe and PayPal remain the two that set up automatic renewal.
- They collect into the platform's account only. In the franchise model a restaurant that takes its own payments keeps its own Stripe or PayPal keys; the hosted-page gateways are not offered on that restaurant's storefront, because the money would land in your account instead of theirs — see Business model.
Mollie
- Sign in to the Mollie Dashboard and open Developers → API keys.
- Copy the Test API key (
test_…) while you are testing, or the Live API key (live_…) when you go live. The key decides the mode, so the card has no switch.
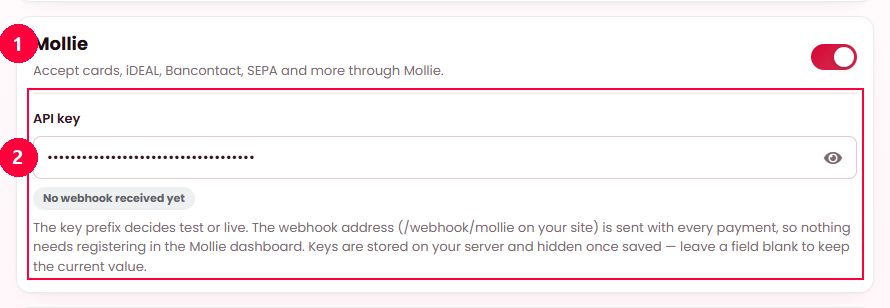
- Turn Mollie on.
- API key — starts
test_orlive_.
Press Save settings. Nothing to register at Mollie: each payment carries your site's notification address, and Mollie calls it on its own.
Square
- Sign in to the Square Developer Dashboard and open your application (create one if you have none).
- On Credentials, pick Sandbox or Production at the top and copy the Access token.
- On Locations, copy the Location ID of the location that should take the payments.
- On Webhooks → Subscriptions, add a subscription with the URL
https://your-site.com/webhook/square, tickpayment.updatedandpayment.created, save, and copy its Signature key.
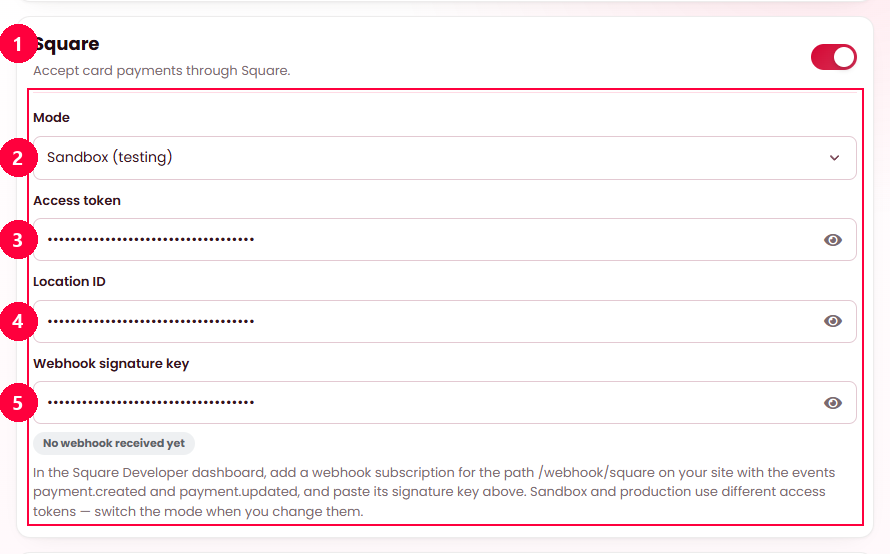
- Turn Square on.
- Mode — Sandbox or Live; match the tab your token came from.
- Access token.
- Location ID.
- Webhook signature key — from the subscription above.
Press Save settings.
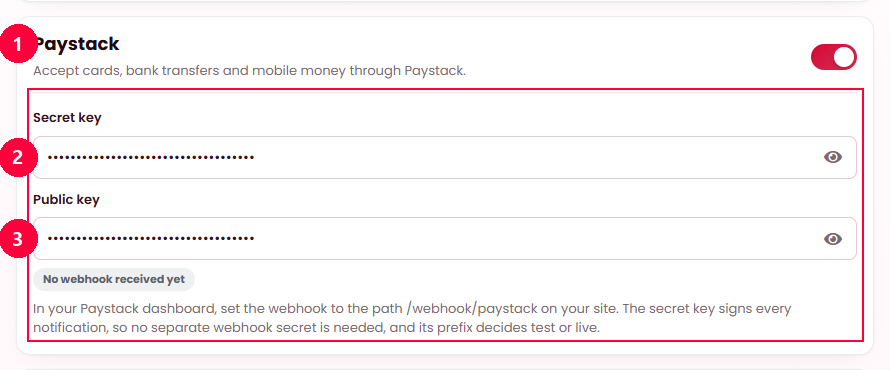
Paystack
- Sign in to the Paystack Dashboard → Settings → API Keys & Webhooks.
- Copy the Test secret key (
sk_test_…) or the Live secret key (sk_live_…). The key decides the mode. The public key is optional. - On the same page set the Webhook URL (test or live, to match the key) to
https://your-site.com/webhook/paystack. Paystack signs each callback with your secret key, so there is nothing else to copy.
- Turn Paystack on.
- Secret key — starts
sk_test_orsk_live_. - Public key — optional; starts
pk_.
Press Save settings.
Flutterwave
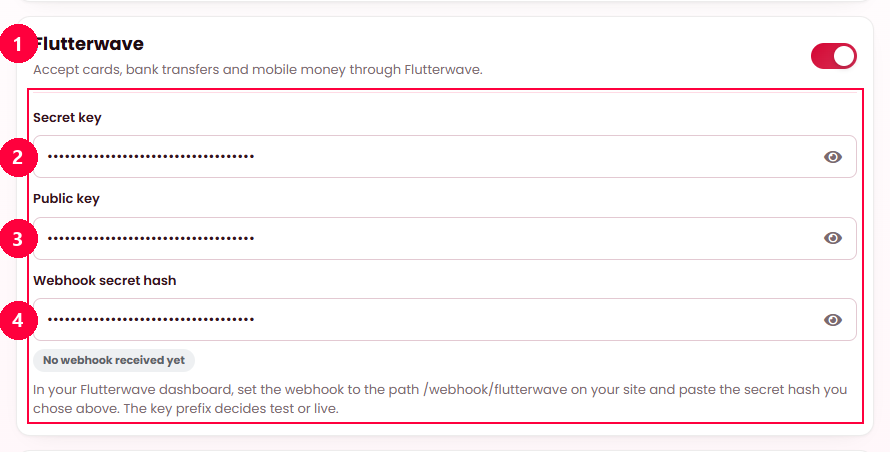
- Sign in to the Flutterwave Dashboard → Settings → API Keys.
- Copy the Secret key —
FLWSECK_TEST-…for testing,FLWSECK-…when live. The key decides the mode. The public key is optional. - Under Settings → Webhooks, set the URL to
https://your-site.com/webhook/flutterwaveand type a Secret hash of your own choosing. Flutterwave sends that hash with every callback, and the card checks it.
- Turn Flutterwave on.
- Secret key — starts
FLWSECK. - Public key — optional; starts
FLWPUBK. - Secret hash — the same value you typed in the Flutterwave dashboard.
Press Save settings.
PayU (India)
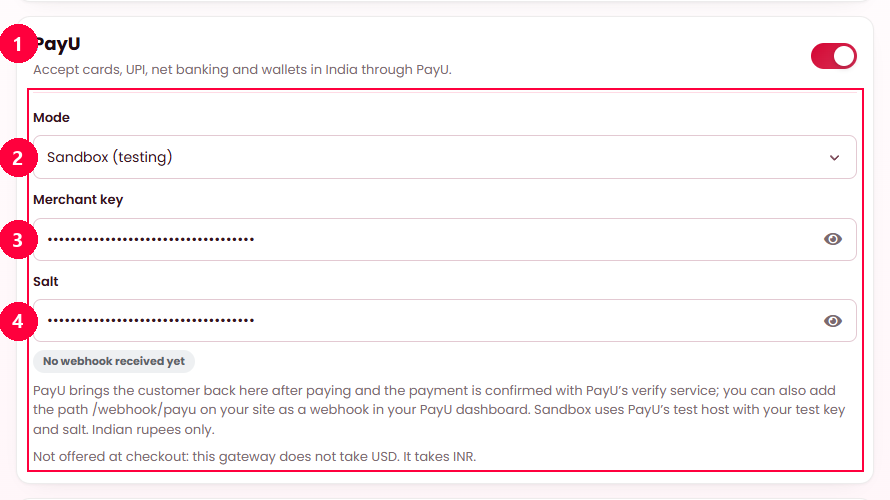
- Sign in to the PayU Dashboard and open Developers → Test Mode for the test credentials, or Live Mode once your account is approved.
- Copy the Merchant Key and the Merchant Salt (the SHA-512 salt).
- Ask PayU to set your webhook (payment notification) URL to
https://your-site.com/webhook/payu— it is configured under Developers → Webhooks in the dashboard, or by PayU support on older accounts. The callback is signed with your salt.
- Turn PayU on.
- Mode — Test or Live; match where the key came from.
- Merchant key.
- Salt.
Press Save settings. PayU charges in Indian rupees only, so the card is offered at checkout only while the platform currency is INR.
SSLCommerz
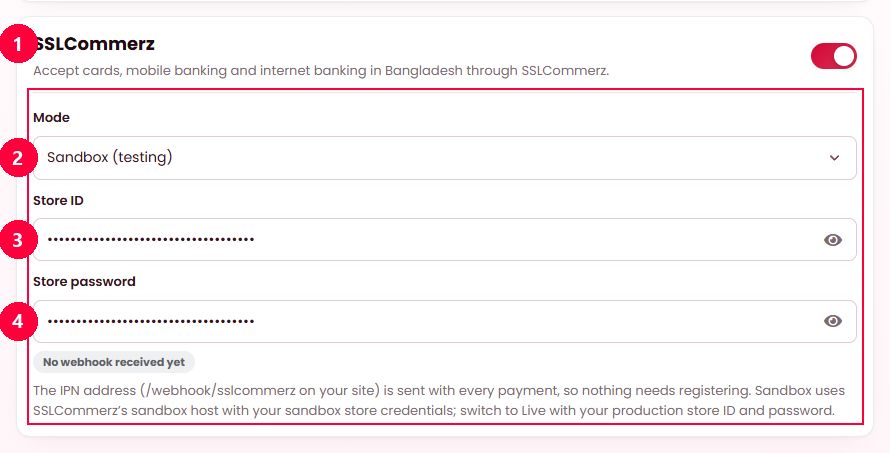
- For testing, create a sandbox account at the SSLCommerz developer site; the confirmation e-mail carries a Store ID and Store Password.
- For live payments, sign in to the merchant panel and read the same two values under My Stores.
- Optionally set the IPN URL in the panel to
https://your-site.com/webhook/sslcommerz. Each payment already carries it, so this is a backstop rather than a requirement.
- Turn SSLCommerz on.
- Mode — Sandbox or Live.
- Store ID.
- Store password.
Press Save settings.
Webhooks, and why they are not optional
Checkout settles itself: the customer’s browser comes back to your site and the order is marked paid. A webhook is how you hear about money that moves when nobody is looking at a browser — above all the monthly renewal of a restaurant’s plan.
Without a webhook, a renewal is charged by the provider and never recorded here. The restaurant pays and their term is not extended.
Adding the Stripe webhook
- Open Developers → Webhooks and choose Add endpoint.
- Set the endpoint URL to
https://your-site.com/webhook/stripe. - Subscribe to these five events:
Event What it tells the application payment_intent.succeededA customer’s card order was paid. invoice.paidA subscription charge — the first one and every renewal. invoice.payment_failedA renewal was declined; the term enters its grace period. customer.subscription.updatedAn agreement was cancelled or suspended. customer.subscription.deletedThe agreement ended; renewal stops. - Save, reveal the signing secret (
whsec_…) and paste it into Webhook signing secret in Settings → Payment.
Adding the PayPal webhook
- In the same PayPal app, scroll to Webhooks and choose Add Webhook.
- Set the URL to
https://your-site.com/webhook/paypal. - Subscribe to
PAYMENT.CAPTURE.COMPLETED,PAYMENT.SALE.COMPLETED,BILLING.SUBSCRIPTION.ACTIVATED,BILLING.SUBSCRIPTION.CANCELLED,BILLING.SUBSCRIPTION.SUSPENDED,BILLING.SUBSCRIPTION.EXPIREDandBILLING.SUBSCRIPTION.PAYMENT.FAILED. - Save and copy the Webhook ID into Settings → Payment.
PayPal gives you an ID rather than a secret. Each callback is verified by asking PayPal about that ID using your Client ID and Secret, so the webhook must belong to the same app as the credentials you saved.
Hosted-page gateway notifications
The six hosted-page gateways never renew a plan, so their notifications matter less: the customer's return to your site confirms the order, and the hourly reconcile job confirms one whose browser never came back. Register them anyway where the provider asks for a URL — a payment confirmed twice is harmless, and a customer who closes the window on the provider's page is then recorded within seconds instead of within the hour.
| Gateway | URL to register | How the callback is checked |
|---|---|---|
| Mollie | Nothing to register — sent with every payment. | The payment is read back from Mollie by its id. |
| Square | https://your-site.com/webhook/square | HMAC signature with the subscription's signature key. |
| Paystack | https://your-site.com/webhook/paystack | HMAC signature with your secret key. |
| Flutterwave | https://your-site.com/webhook/flutterwave | The secret hash you chose. |
| PayU | https://your-site.com/webhook/payu | The reverse hash, made with your salt. |
| SSLCommerz | https://your-site.com/webhook/sslcommerz (optional) | The transaction is validated with SSLCommerz by its id. |
Whatever the callback says, an order is marked paid only after the provider has confirmed the payment for that order, at that amount, in your currency.
How to tell it is working
Take one test payment. Settings → Payment then shows a badge on the gateway's card, beside the webhook field (or under the last field, for a gateway that signs with its own key):
| Badge | What it means |
|---|---|
| Webhook verified, green | A callback arrived and its signature checked out. The event and time are shown underneath. |
| Rejected, red | A callback arrived but the signature did not match — usually the wrong signing secret. |
| No webhook received yet, grey | Nothing has arrived. The endpoint is missing, the URL is wrong, or no payment has been made. |
The badge always shows the most recent result, not a history. A rejection that you have since fixed disappears as soon as a good callback arrives.
When it doesn’t work
Payments succeed but nothing is recorded, and the provider shows no deliveries
The webhook is almost certainly in a different account from your keys. Stripe has both a legacy Test mode inside your main account and separate Sandbox accounts; an endpoint created in one never receives events produced by keys belonging to the other.
Check which account your keys belong to: the account identifier is inside the key itself, straight
after 51 — a key beginning sk_test_51ABCDEFGH… belongs to account
acct_1ABCDEFGH…. Every object that account creates repeats the same fragment in its
own identifier, so you can confirm at a glance that you are looking in the right place.
The badge says Rejected
The signing secret does not match the endpoint. Each endpoint has its own secret; copying one from a different endpoint, or from a different account, fails every time. Reveal the secret on the endpoint you actually created and paste it again.
Nothing arrives on a local installation
Neither provider can reach localhost or a machine behind a private network. Checkout
still works, because the browser return settles it — but renewals cannot record. Test webhooks on
a public address. The hosted-page gateways refuse a notification address they cannot reach, so on
a local installation they are opened without one and the return leg alone confirms the order.
A hosted-page gateway is on but not offered at checkout
Three gates, all visible on its card: every required field is filled, the platform currency is one the provider takes (the card lists them and warns when it is not), and — in the franchise model — the restaurant is not collecting its own payments. Vendor purchases paid to the platform (plans, placements, royalty invoices) are offered every hosted rail regardless of the last one.
The customer paid on the provider's page but the order still says unpaid
The order is confirmed when the customer comes back to your site, when the provider's notification arrives, or when the hourly reconcile job asks the provider about every open reference — whichever happens first. Check the webhook badge on the card, then that the cron is running. A declined or abandoned payment is reported plainly on the order's tracking page and the order stays payable.